Prisma app is making waves across the world ever since its release one month back. In India, the app was initially made available in closed beta. However, tech enthusiasts managed to download the relevant app file from third-party sources and installed the app since they can’t wait to experience the features. We also managed to work with Prisma even before it is officially released in India. In a surprise move, the company closed the beta channel and officially launched the app in India. The Prisma app is now available for download from Google Play Store. If you are using Prisma in the default mode, then you need to learn how to tweak it in such a way that the features can be extended. In this article, we will explore how you to enhance the usage of Prisma app.
To work with Prisma, you need to either capture an image from within the app or pick the relevant image from the photo gallery from your smartphone.
1. Watermark removal
Prisma developers have done a trick by embedding a watermark on the generated artworks. You will find the watermark on all the images which you have painted using the app. However, you remove the watermark by selecting the “star” icon located in the middle of the right side and deactivating the watermark option. You need to slide the control towards the left to deactivate.
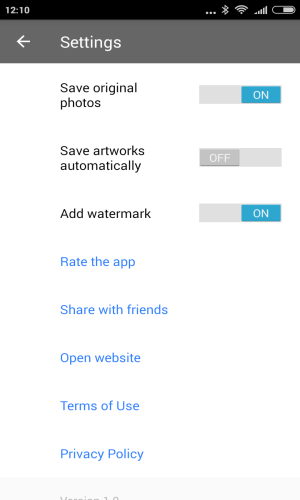
You have to use this option if you intend to share the final image on social media. If you are planning to take a printout of the photos, you have to deactivate this option. Otherwise, the watermark will look big in hard copy.
2. Adjust Intensity
By default, the artworks are created on Prisma with 100 percent intensity. However, you can adjust the intensity of the filters by swiping left or right on the photos.
3. Automated saving of artworks
By default, you have to save all the artworks manually after Prisma app renders it finally. However, you can save time by enabling automatic saving of artworks. If you enable this option, then all the photos will be saved automatically to the Prisma folder in the background as soon as the app finishes rendering of artworks. You need not have to do any extra work.
It would be helpful if Prisma app provides a choice to select the storage location from either internal storage or external microSD card.
4. Never use Prisma app integrated camera
Prisma comes with an integrated camera. But it lacks HDR, night mode, white balance correction and manual mode. However, you can activate and deactivate the flash from the app. Hence, in order to capture a great looking piece of art, you need to either use the camera included with your smartphone. Nowadays, handsets ships with all features, which are required to capture rich images. If you activate HDR mode and apply few filters, you will have few nice images, to begin with, to create a splendid artwork with Prisma. Alternatively, you can also use third-party apps such as Camera360 to apply filters to photos. You will be able to create great artwork if you capture square photos. This is because Prisma only accepts photos, which are square in shape.
5. Share your artwork via Prisma app
As soon as Prisma finishes rendering of artwork, you will be able to view share options. You can easily share the work via either Facebook or Instagram. Moreover, if you select the share button, you will be able to view several options including the ability share to WhatsApp, Hangouts, Gmail and much more.
6. Make use of MSQRD
Normally, Prisma is used to decorate selfies. You can add extra layer of special effects to all the selfies with the effective use of third-party selfie apps such as MSQRD. You can also make use of apps such as Layout, which has the ability to create Prisma photos with several frames. It will also help your photos to stand out from the crowd.
As you can see, there are several ways by which you can enhance the look and feel of the artwork created out of Prisma app.






Add Comment